
BLOG
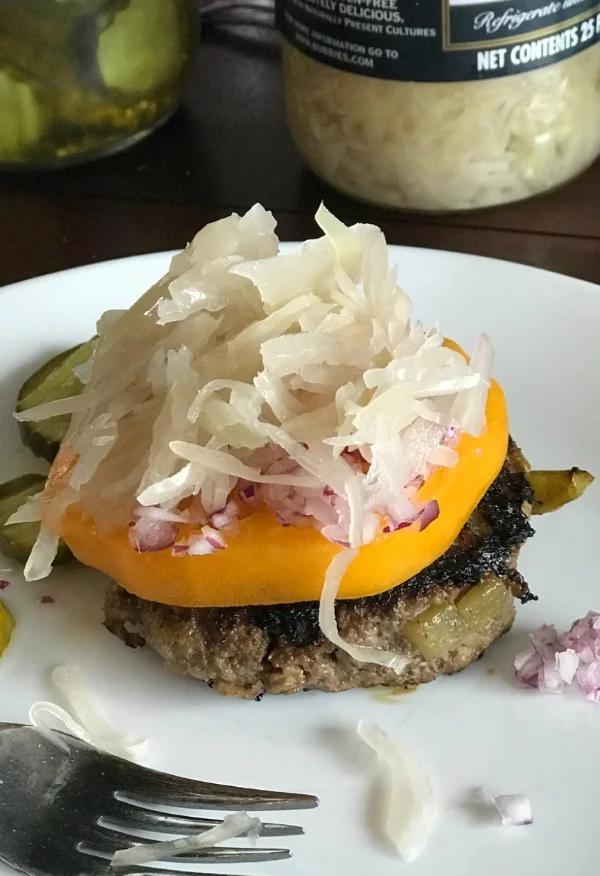
Our Perfect Burger
Hey Hey Diva friends!
I hope you had a wonderful 4th! Need some inspiration for dinners the rest of the week? Look no further...I know that this recipe becomes a staple for you as it has for us. This is our FAVORITE burger recipe and when I'm in a hurry or haven't planned dinner ahead of time we simply thaw some beef and throw this sucker together!
What you need:
- 1lb grass-fed beef
- Cumin
- Red onion
- 1 4oz can diced green chilis
- salt
- garlic
- Heirloom Tomato
- Bubbies Pickles
- Bubbies Sauerkraut
To make:
- Chop approximately half small red onion (you need about 1/4 cup chopped. Save the rest to top the burgers )
- Mix the beef, red onion and diced chilis (do not drain the can) together.
- Spice according to taste - I probably add about 1TBS of cumin and a large dash of salt and garlic.
- Thoroughly mix the beef mixture in a bowl with your hands and squeeze tightly into 4 patties
- Cook on a skillet over medium heat approximately 6-8 minutes on each side or until a thermometer reads 165F in the middle.
- Top with fresh tomato, onion, pickles and sauerkraut.

Watermelon Juice
Hey Hey Diva friends!!!
The 4th is TOMORROW and I'm sure you are heading to a BBQ or inviting friends over to celebrate while YOU grill out....either way, I wanted to share one of THE most insole yet delightful recipes I've recently stumbled upon....that is...WATERMELON JUICE!
Why make the juice instead of eating the fruit? I actually think it helps the watermelon taste sweeter. Think about it- when you cut the watermelon up, all the juice drains to the bottom of the bowl...when you make watermelon juice, you drink EVERYTHING and it tastes incredibly delicious!

Here's what you need:
- 1 very red, very ripe watermelon
- Blender
- Yup - that's it!!
- Cut your watermelon into small enough chunks to fit comfortably in the blender
- Blend
- Chill
If you really want to be fancy, garnish with some mint or berries or even top with some homemade whipped cream. When you stumble upon a truly ripe watermelon this incredibly basic recipe is truly a delight!

Soup your way to a healthier gut!
Hey hey Diva friends! Let's talk about soup and gut health....sounds good right? What is easier than indulging in some delicious soup in this cold weather?

Soup certainly doesn’t sound like any special life changing superfood. It’s soup, you’ve eaten it all your life. Yet soup has massive potential that often gets hidden behind nasty preservatives and less than ideal flavoring agents. The true beauty and nourishment happens with whole food ingredients and high quality homemade bone broth.
This is where the magic happens.
A daily soup made from local, seasonal ingredients and high-quality broth is better than any superfood or supplement out there. It’s a wholesome way to nourish your skin, immune system, joints, digestion and gut health.
Homemade bone broth is rich in natural gelatin which is anti-aging and great for rebuilding damaged intestinal lining. Making bone broth from scratch is as easy as throwing your leftover chicken carcass in a large pot of water and letting it simmer for 24 hours. This gets all the good stuff out of the bones and into the liquid.

Patrick makes an amazing broth with a few simple ingredients:
- chicken carcass
- onion
- carrots
- celery
- poultry spices ( rosemary/sage/thyme)
- salt
- Place all ingredients in the crockpot, fill it up with water (purified!) and let it simmer for 24-48 hours. Use this as the broth base for any soup recipe, or simply enjoy a warm cup like coffee. 1-2x/day.
Note* let your broth cool after you have strained it (not TOO long as bacteria will grow quickly) and scoop off the fat layer that settles on top. The more fat the more healthy collagen is in your broth! Keep frozen or in the fridge for up to 5 days. If my broth is in the fridge 5-6 days or longer I simply make sure to boil it again before drinking.
Go to your local farmer’s market and get the freshest seasonal produce you can find. In the summer you may enjoy fresh garlic, beets and carrot in a homemade stock and blending with fresh dill. Served cold on a hot day with a drizzle of plain yogurt, this soup is refreshingly tangy and packed with nutrients.
In the Fall and Winter, soups made with root vegetables and hearty herbs like sage and rosemary are ideal. It’s all about sourcing local, pesticide-free vegetables for the most nutrient dense soups. Nothing you can buy from the store compares to what you can make at home with relatively little effort.
The flavor base of every good soup should be sauteed onions, garlic and herbs. This is what all those flavor packs are trying to emulate. It doesn’t take long to cut up an onion and throw it in a hot pan with some olive oil, but it makes all the difference.
Add all ingredients to your blender and process until super smooth. Enjoy!!
If you’re seriously interested in getting healthy, restoring your digestion and boosting your energy then check out my new comprehensive program Get Gutsy With Me launching January 15th, 2018!
In the program you get a ton of delicious satisfying recipes as well as strategies that will help rebuild your intestinal flora.
Not sure you're ready for all that?! Join me on my Facebook page Stop Dieting and Live your Life! where I’ll be sharing more information, tips and recipes to help you live a happier, healthier life. PLUS you'll receive free access to my Holiday Survival Guide along with extra recipes and support to navigate this holiday season with ease :)
Share YOUR favorite soup below!
bye for now!

Halloween Recipe Roundup!
I don't love Halloween. But I DO love treats that ANYone can enjoy without the sugar crash or guilt afterward!
Try a few of these at your next get together whether it's spooky or not!
Chickpea Brownies

Original recipe from 21 Day Fix!
I am a FAN of brownies. I've tried several different recipes that call for almond flour, coconut flour, or even almond butter and no flour! I love brownies you guys....show me a recipe that falls within my foodie guidelines and I'll probably try it. Currently, my favorite brownies are these chickpea brownies. Whether you are gluten free, paleo, or you think all of that is stupid. These are sure to please :)
Ingredients:
1 (15 oz) can of chickpeas/garbanzo beans. Rinsed and drained.
1/4 cup of butter (or extra virgin coconut oil)
2 large eggs
1/2 cup of maple syrup
1/3 cup of unsweetened cocoa powder
1/2 tsp. baking powder
1 pinch sea salt
1/4 cup of Enjoy Life mini chocolate chips
Directions:
- Preheat oven to 350 degrees.
- Line a 9×9 inch baking pan with parchment paper and set aside.
- Place chickpeas, butter, eggs, maple syrup, vanilla, cocoa powder, baking powder and salt in a food processor; cover. Blend until smooth.
- Add chocolate chips; mix by hand until blended.
- Evenly spread batter into prepared pan.
- Bake for 25-28 minutes or until a toothpick inserted into the center of brownies comes out clean.
- Cut into squares and use powdered sugar to decorate with fun patterns for any occasion.
- Enjoy!
*NOTES - these brownies crumble easily and so they do better if you really let them cool and then place them in the refrigerator for awhile. It makes them more fudge and easier to handle!
Vanilla Cupcakes

Who doesn't love a cupcake? This recipe is from www.elanaspantry.com and I would highly recommend you check out her site for more amazing recipes!
Ingredients:
- ¼ cup coconut flour
- ⅛ teaspoon himalayan pink sea salt
- ⅛ teaspoon baking soda
- 3 large eggs
- ¼ cup palm shortening
- 2 tablespoons honey
- 1 tablespoon vanilla extract
Instructions
- In a food processor, combine coconut flour, salt, and baking soda
- Pulse in eggs, shortening, honey, and vanilla
- Line a cupcake pan with 6 paper liners and divide batter between each
- Bake at 350° for 20-24 minutes
- Cool for 1 hour
- Frost with Whipped Cream Frosting
NOTES* Alternatively you could make chocolate cupcakes and/or make paleo chocolate frosting and decorate it like a poop emoji for halloween.....yes I just said that ;D
Witches Fingers

This recipe is from forkandbeans.com!
INGREDIENTS:
- 2 dates, chopped with pits removed + 1 Tb water
- 1/3 c. raw walnuts
- 1/3 c. raw almonds
- 1/3 c. raw cashews
- 1 Tb raw cacao powder
- 4 raw almonds, sliced in half
DIRECTIONS:
- In a food processor, blend dates and water until a rough paste is formed.
- Add nuts and cacao. Blend until a dough forms.
- Using 1 Tb of dough, form into finger shapes with hands.
- Place almond slice at the tip for fingernail.
- Chill for 15 minutes or devour immediately.
Dipped Apples

This recipe is from paleoleap.com!
Ingredients
- 6 organic apples (granny smith, gala, and fuji are some of the best varieties to pair with the sweetness of the chocolate);
- 1 lb of white or dark chocolate, cut into chunks;
- 1 cup of each topping choice (crushed macadamia nuts, chopped almonds, shredded coconut…);
- 6 Popsicle or lollipop sticks
Directions
- Wash the apples and twist the stems off, push a stick into the core of each apple.
- The chocolate will adhere better to the apples if they are cold, so place the apples in a refrigerator while preparing everything else.
- Place your topping choices into individual bowls. It’s best to make sure your toppings are in small pieces; anything too large will not stay on the apple.
- Heat the chocolate in a double boiler or in the microwave until almost fully melted. Remove from the heat and stir: it should fully melt and be warm, not hot. If using a microwave, heat in 30-second intervals, stirring in-between, to make sure the chocolate doesn’t burn. White Chocolate has a lower burning point than dark chocolate so it’s important to watch this more closely. If using the microwave method to melt white chocolate, reduce the power to 50%.
- Dip the apples into the chocolate, raising them to allow the extra chocolate to drip back into the bowl.
- Using your hands or a spoon, sprinkle your topping of choice onto the freshly dipped apple. I found it easiest to hold the apple horizontally close to the core and slowly spinning it while spooning on the toppings.
- Place on a wax paper lined cookie sheet and in the refrigerator until the chocolate is set, about 15 to 30 minutes.
- Enjoy right away or keep in the refrigerator until serving.

